V-flats are one of the most versatile, misunderstood, and under-utilised lighting tools in photography. They’re inexpensive, lightweight, and deceptively simple — yet they can dramatically change the way light wraps, shapes, and defines your subject. From soft beauty portraits to high-contrast editorial setups, from natural light control to commercial product shoots, V-flats give you professional-level light manipulation without needing extra lights or expensive modifiers.
But most guides barely scratch the surface. They explain bounce vs negative fill, maybe show you a portrait example, and stop there.
This guide goes all the way.
You’re about to learn:
This isn’t just a guide — it’s the central chapter of Bohemia Bay Studio’s full Lighting Education Hub.
It’s designed to help photographers at every level build competence, confidence, and control in the studio.
V-flats solve multiple lighting problems at once:
They’re fast.
They’re predictable.
And they work in both beginner and high-end setups.
Yet many photographers never learn to use them properly — or think they’re “just for portraits.”
This guide changes that.
By the end, you’ll understand not just how to use V-flats…
…but how to think with them — to shape light intentionally, consistently, and professionally.
Most guides fall short because they:
This guide covers all of that — and more — in structured, easy-to-follow sections that blend professional lighting theory with real, repeatable setups.
This guide is part of the Bohemia Bay Studio Lighting Hub, including:
Each guide links to the others so beginners can learn progressively — and professionals can refine specific techniques.
At the end of this guide, you’ll find:
For now, let’s begin.
Light does three things when it hits a surface:
V-flats use this to your advantage:
The V shape creates stability (it stands without a stand), but it also creates:
Changing one angle changes the entire mood.
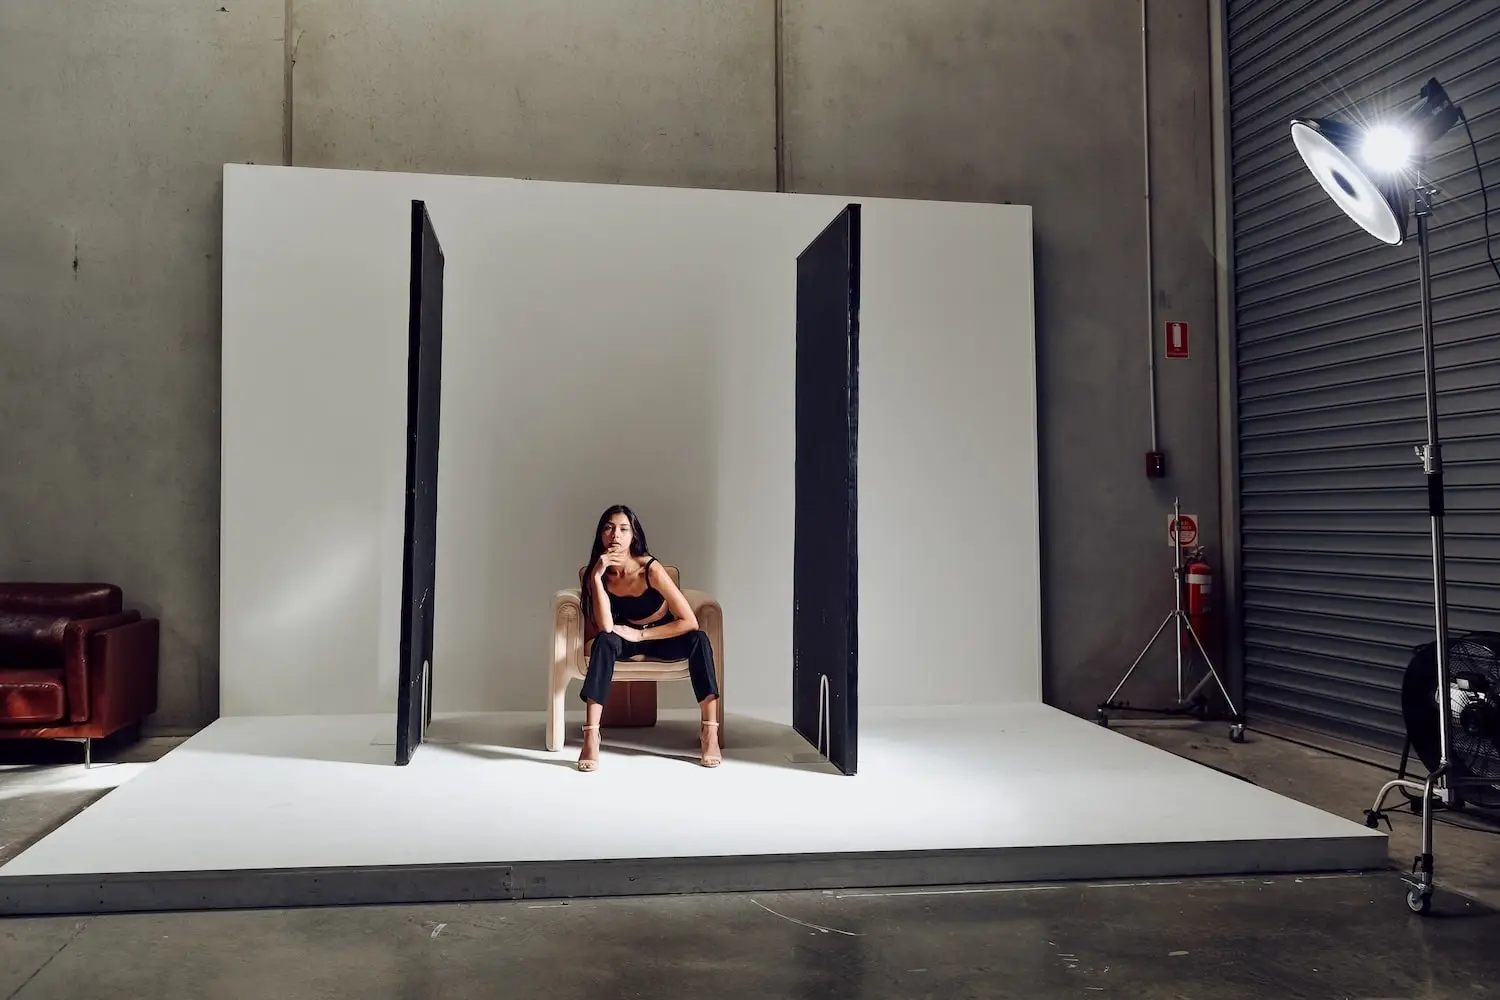
In Australia, you’ll most commonly see:
These are the exact boards we use and recommend at Bohemia Bay Studio.
Pros: lightweight, foldable, durable
Cons: expensive to ship to Australia, smaller surface area, less stable
Pros: light, inexpensive
Cons: too thin — falls over, warps, breaks easily ▶ Not recommended
V-flats aren’t just a lighting tool—they’re one of the fastest ways to improve the quality of your shoot when you book a professional studio. Whether you’re shooting portraits, products, campaigns, or beauty work, V-flats give you instant control over:
The reason this matters for studio hire is simple:
A studio gives you the space, but V-flats give you the control.
They turn any lighting setup—strobe, continuous, or natural—into something more precise and repeatable. In our Melbourne studio, V-flats are available at no charge and positioned near mapped lighting zones, so you can walk in, place them, and immediately achieve cleaner light, better contrast, and more professional results without needing a lighting assistant.
If you’re hiring the space for e-commerce, portraits, lookbooks, campaigns, UGC, or personal branding, mastering V-flats is one of the easiest ways to level up your shoot quality from the moment you walk through the door.
V-flats solve six major lighting problems:
White bounce can turn a harsh light into a soft one.
Great for: beauty, headshots, full-body fashion, lifestyle, products.
Black negative fill sculpts cheekbones, jawlines, arms, and clothing folds.
This is how high-end fashion and portrait shooters create dimensionality.
With natural light, you can:
One strobe + two V-flats can look like a three-light setup.
Essential for:
V-flats create clean gradients and prevent unwanted reflections.
Most beginners overfill a scene or use too much white space.
Black V-flats fix this fast.
Not all V-flats are made equal. Some are perfect for professional studios, some for beginners, and some aren’t worth the effort.
This section breaks down every major type — including real-world pros, cons, and when you should (and shouldn’t) use each.
Best for: Photography studios, commercial work, portraiture, eCommerce, beauty, fashion
Material: Hardware-store polystyrene sheets (2400 × 1200 × 50 mm)
Cost: $40–$60 per sheet
This is the most common and most effective V-flat in Australia because polyboard is cheap, huge, and incredibly effective at shaping light.
This is the gold standard for a reason. Every major Melbourne, Sydney, and Brisbane studio uses these.
Best for: Photographers with limited space, studio owners who travel, premium setups
Material: Foldable foam-core panels with fabric hinges
Cost: $350–$600+ per set
These are pre-made V-flats sold by brands like V-Flat World. Excellent quality, beautifully designed — but expensive and harder to source in Australia.
Gorgeous but pricey. Great if you want beautiful gear or have limited space, but polyboard still performs better for most commercial photoshoots.
Best for: Beginners, small product photography, tight spaces
Material: Thin foamboard (5–10 mm)
Cost: $10–$30 per sheet
These look nice but aren’t suitable for professional shoots.
Use only for tabletop or very small setups. Not recommended for people, fashion, or full-size products.
Best for: Outdoor shoots, events, mobile setups
Material: Corrugated plastic (corflute), PVC sheets
Cost: $30–$70 per sheet
These are often used by event photographers because they’re more weather-resistant than polystyrene.
Good for mobile or event shooters, but not ideal for controlled studio work where softness and consistency matter.
Best for: Travelling photographers, location studios
Material: Lightweight aluminium frame + reversible fabric covers
Cost: $180–$350
A relatively new category: compact, portable V-flats designed for travel kits.
Fantastic for location lifestyle shoots, not strong enough for high-end studio shaping.
Best for: Permanent studio installations
Cost: $30–$60 per sheet
Rare these days, but useful in some situations.
Only suitable if permanently installed and safely anchored.
If you’re a professional photographer →
👉 Choose DIY polyboard V-flats (2400 × 1200 × 50 mm)
They offer the best balance of size, softness, price, and performance.
If you’re shooting on location →
👉 Choose foldable fabric V-flats or commercial foldable V-flats
If you’re a beginner or working in a small space →
👉 Foamcore is okay only for tabletop or product work.
If you’re building a permanent studio →
👉 Painted MDF can work but is not ideal for shaping light.
V-flats are at their best when they’re used practically — shaping, subtracting, or controlling light to create professional, repeatable results.
Below are the twelve most useful lighting setups, covering everything from soft beauty looks to dramatic editorial portraits.
Each setup includes:
This section is designed to be skimmable, bookmarkable, and studio-ready.
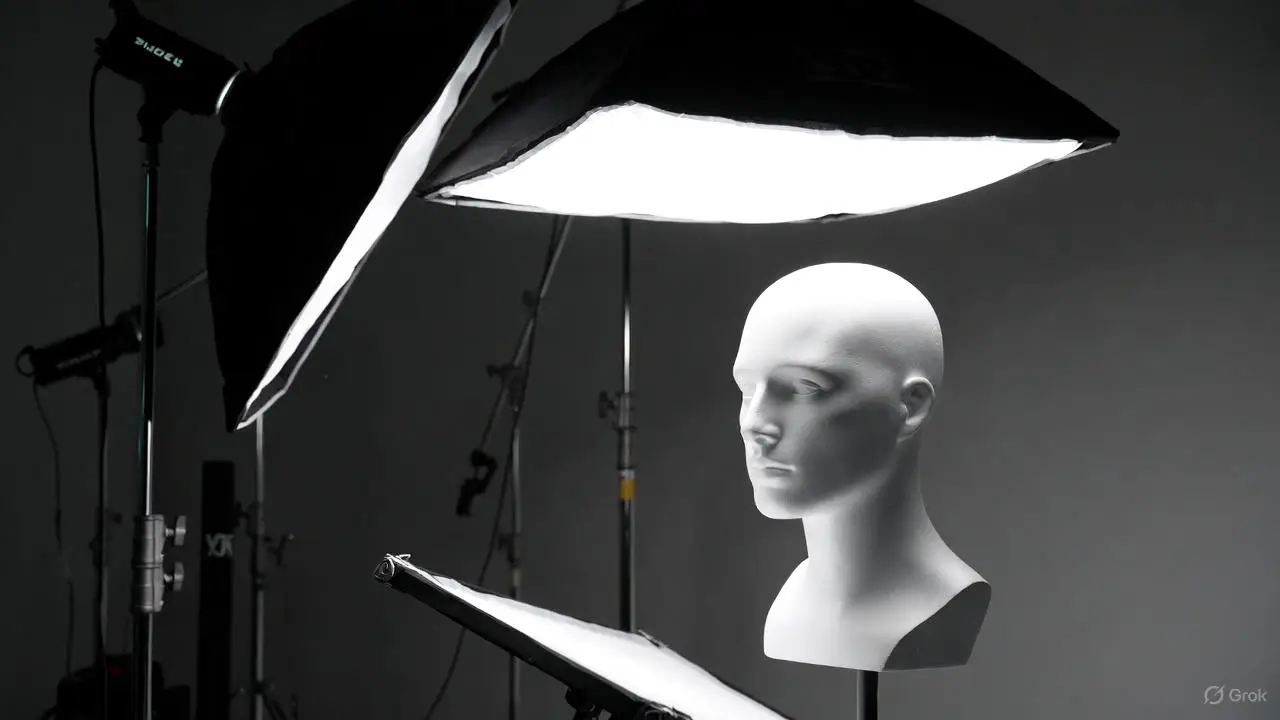
Creates ultra-soft, glowing light with lifted shadows and smooth skin tone transitions.
V-flat: 30–60 cm from the subject’s shoulders
Light: 1–1.5 m from the subject
✨ Smooth, youthful skin
✨ Soft catchlights
✨ Even fill across the face
Beauty, skincare, headshots, jewellery, eCommerce models.
Adds contrast and definition to cheekbones, jawlines, and clothing folds.
🔥 Stronger shadows
🔥 More depth and dimensionality
🔥 A more expensive, editorial look
Men’s portraits, fashion, moody branding, fitness.
Creates a soft but directional light with controlled falloff.
Smooth highlight-to-shadow transition without losing shape.
Modern beauty, editorial portraits, clean eCommerce.
Adds soft, even illumination across the entire body for consistent lookbook or campaign shots.
🕊 Softened shadows head-to-toe
🕊 More even exposure for clothing textures
Lookbooks, model digitals, eCommerce fashion.
⚫ Bold, sculpted shadows
⚫ High-fashion editorial
⚫ Extreme dimensionality
Editorial, fitness, dramatic menswear.
Creates perfect, clean gradients on reflective surfaces.
✨ Luxury gradients
✨ Clean highlights on bottles, cosmetics, packaging
Skincare, beauty, FMCG, reflective products.
Deepens shadows and accentuates shape.
Strong shape, high contrast, dramatic edges.
Luxury cosmetics, fashion accessories, food/hero shots.
Boosts natural light from a window without adding harsh shadows.
Soft, glowing, natural feel — perfect consistency.
Lifestyle portraits, branding shoots, kids/babies.
Sharper shadows, more directional feel, added mood.
Moody natural-light portraits, creative editorial.
Stops light from wrapping too far around your subject.
Cleaner profiles, stronger mood, crisp edges.
Split lighting, film-style portraits.
Not strictly a lighting setup — but extremely useful.
Creates a clean zone around the subject, reducing distractions or movement behind camera.
More focus, less reflection, calmer subject.
Simulates shooting against a wall for directional light shaping.
Modern editorial look, great for small studios.
V-flats are simple — but choosing the right side (white vs black) is where the real skill lies.
Most photographers overuse white and underuse black, leading to flat, washed-out, low-contrast images that feel “cheap.”
This section teaches readers how to use each side with intention — and how subtle shifts completely change the mood, shape, and professionalism of an image.
White = add light, soften shadows, smooth transitions, wrap illumination.
But the important nuance is this:
👉 White doesn’t just “brighten” — it increases the size of your light source.
A bigger source = softer, smoother light.
This is why photographers who only use white boards get stuck in a “same look” rut.
Black = remove light, increase contrast, tighten shadows, sculpt features, control spill.
If white is additive, black is subtractive.
👉 Black doesn’t create shadows — it protects them.
This is the difference between amateur and pro lighting control.
This is why precision matters.
Here’s the rule I teach beginners and professionals alike:
👉 If you want to flatter, use white.
If you want to sculpt, use black.
And here’s the pro-level refinement:
👉 Use white to fill shadows you don’t want.
Use black to protect shadows you do want.
This is the mindset shift that transforms your lighting.
One of the best techniques is combining white and black at the same time:
Fills shadows + extends the wrap of your key light.
Protects sculpting shadows + adds definition.
This creates a “premium portrait look” used in:
It's balanced and dimensional — the perfect middle ground.
Whether you use white or black, distance controls intensity.
Here’s the cheat sheet:
DistanceEffect< 30 cmHeavy effect — strong fill or strong negative fill30–60 cmMedium, natural effect60–100 cmLight, subtle effect> 1 metrePractically no effect
The closer the V-flat, the more powerful its influence.
This is why moving a V-flat 20 cm can change the entire mood.
To give this guide real-world depth:
Pro tip:
Many photographers use black for men and white for women.
But the better approach is to use the style, not the gender, as the deciding factor.
This is why styling teams often request black fill for editorial and white fill for catalogue.
At Bohemia Bay Studio, both our north and south doors create unique behaviours:
This is a massive advantage your guide can explain better than any competitor.
V-flats are uniquely powerful because they adapt to any style, light source, or creative direction.
This section gives you the core setups photographers use daily across portraits, eCommerce, beauty, and natural light shoots.
These are the foundational setups — the ones every great lighting system (including LightRight™) builds from.
Portraits are where V-flats shine the most.
Whether you're shooting beauty, corporate, menswear, fitness, or editorial fashion, V-flats give you the fastest, most predictable control over shape, contrast, and contour.
Below are the essential portrait setups you can use at Bohemia Bay Studio — no matter your skill level.
Purpose: Ultra-soft, flattering, clean beauty light
How it works:
Gives you:
✨ Glowing skin
✨ Soft, gentle transitions
✨ Natural, even tones
Best for:
Beauty, skincare brands, female portraits, eCommerce headshots.
Purpose: Add controlled contrast + shape
How it works:
Gives you:
🔥 Strong cheekbones
🔥 Dimensionality
🔥 A “premium editorial” look
Best for:
Menswear, fitness, moody branding, editorial portraits.
Purpose: Combine softness + shape
How it works:
Gives you:
Mix of flattering + dimensional
Perfect balance for brands who want “polished but real.”
Best for:
Modern personal branding, fashion/lifestyle, commercial portraits.
Purpose: Maximum contrast
How it works:
Gives you:
⚡ Bold, chiseled shadows
⚡ High-contrast editorial depth
⚡ Cinematic mood
Best for:
Mens editorial, fitness, music portraits, dramatic campaigns.
Purpose: Create smooth, flawless high-key light
How it works:
Gives you:
Soft, commercial beauty look often used in cosmetics ads.
Best for:
Skincare, haircare, jewellery, clean eCommerce.
Products — especially shiny ones — require precise light control.
V-flats make this incredibly easy without buying specialised reflectors or custom modifiers.
Purpose: Create smooth gradients on reflective surfaces
Setup:
Gives you:
✨ Luxury gradients
✨ Minimal reflections
✨ Premium “high brand” look
Best for:
Cosmetics, skincare, glassware, jewellery, bottles.
Purpose: Deep contrast + sculpted edges
Setup:
Gives you:
Rich shadows + defined edges
Ideal for moody, dramatic product campaigns.
Best for:
Premium fashion accessories, dark packaging, editorial products.
Purpose: Even lighting for catalogue eCommerce
Setup:
Gives you:
Consistent soft shadows, easy retouching, fast workflow.
Best for:
Ecommerce products, clothing flats, soft goods.
Purpose: Smooth backgrounds without specialised backdrops
Setup:
Gives you:
Beautiful roll-off from highlight to midtone
Perfect for glossy campaigns.
This is where your studio absolutely shines (pun intended).
Because Bohemia Bay has both north-facing hard light and south-facing soft light, V-flats become the perfect natural-light modifiers.
Purpose: Amplify soft daylight from roller door
Setup:
Gives you:
Clean, airy, glowing natural light.
Best for:
Personal branding, lifestyle, kids, soft fashion.
Purpose: Sculpt shape in harder natural light
Setup:
Gives you:
Fashion editorial vibes with zero artificial lighting.
Best for:
Moody portraits, editorial fashion, dramatic product shots.
Purpose: Turn window light into a giant softbox
Setup:
Gives you:
Soft, controlled fill without extra gear.
Purpose: Shape natural light into a clean directional look
Setup:
Gives you:
Sharp edges, interesting shadows, clean dimension.
Best for:
Editorial lifestyle, fitness, fashion.
These are the setups that separate hobbyists from working photographers.
Block unwanted wrap from large softboxes or windows.
Great for controlling cheek highlights or clothing shine.
Two V-flats opposite each other act as shadow “walls,” tightening contrast.
Perfect for editorial menswear.
Position black board just outside frame to selectively remove fill on one edge of the face.
Aim key light into a white V-flat rather than directly at the subject.
Produces buttery-smooth sculpting across skin or fabric.
Use black V-flat just behind the subject to stop ambient wrap from windows.
Combine one strobe with a white V-flat to create “two-light” results.
Perfect for beginners.
V-flats are simple tools, but small errors in placement or angle can dramatically change your results.
This section walks through the most common mistakes photographers make and gives quick, practical fixes for each.
The problem:
Most photographers put V-flats 1–2 metres from the subject, thinking they’re doing something — they’re not.
Rule:
👉 If a V-flat is more than 1 metre away, it might as well not exist.
Fix:
What to look for:
White should create a wrap, not flare.
Black should create shadow protection, not a dead void.
Fix:
Shiny surfaces create unpredictable reflections.
Thin polyboard bends and ruins gradients.
Fix:
V-flats are light.
They tip over easily.
And when they fall, they fall fast.
Fix:
At Bohemia Bay Studio, this is especially important because airflow through the roller doors can move boards slightly.
Beginners often place a white V-flat opposite a window and then wonder why their portraits look washed out.
Fix:
Symmetry = safety.
But safety often equals boring.
Fix:
Use asymmetric fill:
This imbalance adds depth and a cinematic feel.
This is a more advanced error.
V-flats don’t just reflect or absorb the key light — they also react to:
Fix:
Think of boards as part of the entire environment, not isolated tools.
Example:
If your ceiling is white, black V-flats may not darken the face enough — spill from above will fill shadows. Solution? Add a flag above.
Different faces require different shaping.
Fix:
This is why V-flats are essential for beauty and fashion work.
Floors reflect a surprising amount of light, especially concrete or light timber.
Fix:
Your key light sets the mood.
Your V-flat sets the shape.
Photographers often adjust the wrong one.
Fix:
If the subject looks wrong:
👉 Move the V-flat before you move the light.
Tiny changes in V-flat angle affect the look dramatically.
Most photographers only think of V-flats as portrait tools.
Huge mistake.
They’re essential for:
Fix:
Keep V-flats closer to reflective products than you would for people.
Product surfaces “read” reflections much more clearly.
FAQs
Learn how to use V-flats for studio lighting—white vs black, shaping faces, sculpting clothing, product setups, mistakes to avoid, and setups for every genre.

A V-flat is a two-panel modifier made from large sheets of foam or polyboard, joined along one edge to form a “V” shape. One side is usually white (for bounce) and the other black (for negative fill). It’s used to control light direction, contrast, shadow depth, and reflections.
Because they provide massive, soft, controllable light at an extremely low cost. White = clean, flattering beauty light Black = sculpted, dramatic editorial light A single V-flat can transform the mood of an image without adjusting your key light.
White side: Adds light, softens shadows, increases wrap, reduces contrast. Black side: Removes light, deepens shadows, increases contrast and shape. White flatters; black sculpts.
The industry standard is: 2400 × 1200 × 50 mm (8 ft × 4 ft × 2 in) Tall enough for full-body shots, thick enough for stability, and wide enough to shape light evenly.
Absolutely — and they’re incredibly effective. Use white to amplify soft window light Use black to add shape in harsh sunlight Use white to bounce light deeper into the studio Use black to block spill from large doors/windows At Bohemia Bay Studio, this works especially well with the south-facing soft door and north-facing hard door.
Learn


.webp)
