December 17, 2025
Posing in the studio is about arranging angles, weight, expression and light so your subject reads confident, flattering and on‑brand. Small changes — a 3/4 torso turn, a back‑foot weight shift or a directional light that sculpts the jaw — alter proportions and personality on camera. This guide explains why each move works and gives studio‑ready solutions for headshots, fashion, e‑commerce and groups. If you struggle with stiff subjects, awkward hands or poses that hide product detail, you’ll find step‑by‑step directions, quick prompts and examples matched to common studio setups. Inside: core posing principles, hands‑and‑arms micro‑directions, short scripts for model direction, pose templates by shoot type, equipment‑to‑pose pairings and strategies for diverse bodies and multi‑subject work. Each H2 section ends with quick lists and practical sequences to speed sessions and improve results.
Essential posing techniques are the simple, repeatable moves photographers use to shape silhouette and expression. By adjusting visible angles, lines and tension you change perceived proportions and set the mood. The fundamentals — body angle, weight distribution, posture, head position and limb spacing — become templates you can apply across portrait styles. Below is a compact set of high‑impact rules to open every session, followed by a quick reference table of essential tips for beginners and common pitfalls. Learn these and you’ll spend less time guessing and more time creating consistent images.
These basics make it straightforward to adapt poses for headshots, full‑body fashion and e‑commerce. They also set you up for the hands‑and‑angles micro‑adjustments covered next.
Use these as repeatable starting points, then tweak for body type, clothing and creative intent.
Different techniques serve different purposes on set — the table below is a quick reminder of what each move achieves and common mistakes to watch for.
Keep this cheat‑sheet handy for quick checks between frames.
Angles and weight change how planes sit in the frame. A subtle 45° shoulder turn narrows the torso while keeping the face readable; shifting weight to the back foot creates a counterpose that reads relaxed instead of rigid.
Practically, turning the torso reveals more of the shoulder‑to‑hip diagonal — these leading lines guide the eye — while a back‑foot bias tilts the hips and often produces a gentle S‑curve through the spine.
Three easy studio setups to try: the standing 3/4, a seated forward‑lean with one knee forward, and contrapposto with the hip out and weight shifted. Watch for over‑rotation (it can hide the face) and feet left parallel (which flattens posture); both are usually fixed with a single micro‑direction.
These angle and weight rules also shape how you place hands and arms so they support — not compete with — the silhouette.
Hands and arms frame your subject and communicate intent. Tense fingers or flattened arms can undo a strong pose, so aim for purposeful placement and soft finger shapes. See our notes on composition & framing.
Give hands something to do: props, a gentle pocket tuck or light contact with the face. When hands are visible, cue a soft curve in the fingers and a small gap from the torso to avoid compression.
Use quick micro‑prompts like “float your fingertips,” “tilt the wrist slightly,” or “rest the thumb by the chin” to relax hands fast — these work on non‑models and experienced talent alike.
Avoid clenched fists, rigid straight arms or splayed fingers. Fast fixes include a prop, a pocket, or rotating the hand so the palm faces away from the camera.
Relaxed hands and intentional arm lines finish the pose and prepare the subject for expression and lighting tweaks.
Directing models is about clear communication: short cues, demonstration and small actions reduce anxiety and produce natural expression. Rather than asking for a static look, give the subject something to do — action prompts create movement and micro‑expressions you can refine with small adjustments.
Below are practical communication techniques and ready‑to‑use prompts, plus short scripts and chaining sequences to turn stiffness into motion. Strong direction speeds sessions and increases usable captures when combined with consistent lighting and pose templates.
Start with rapport and a quick physical warm‑up, then move into short action prompts that are easy to follow and adjust.
These approaches help inexperienced clients feel guided and safe, and set you up for finer micro‑directions.
Begin the session with a concise briefing, then run a few quick prompts to get natural motion flowing.
Sample action prompts and chaining sequences:
Chain movement → expression → micro‑adjustment to move from stiff to relaxed, then refine with lighting and lens choices.
Non‑models respond to calm, specific language and short demonstrations. Keep directions simple and positive to reduce cognitive load. Begin with a 60‑second briefing that explains what will happen, how it will feel and roughly how long sequences take — this lowers anticipatory anxiety.
Use grounding exercises — slow breaths, shoulder rolls, a short walk — to release tension, and narrate the process: “I’ll direct you, adjust the light if needed, and you can look away between sets.” These steps make action prompts more effective because movement breaks stiffness and produces candid expressions quickly.
Narration and micro‑exercises prime the subject for action‑based prompts that turn relaxed posture into expressive portraits.
Action prompts are short directives that focus the subject on movement or a sensory cue, producing real muscle activity instead of a forced ‘look’. Group prompts into movement, expression and hands, and run them as a 5–10 minute warm‑up to generate usable frames.
For movement: “Take two small steps toward me and pause,” then refine the pause with a chin or shoulder tweak.
For expression: memory prompts like “remember a pleasant surprise” will trigger an authentic smile.
For hands: “Lightly tuck your hair behind your ear” gives a natural gesture to photograph.
Chain these prompts and follow each with quick framing and micro‑adjustments to capture variety.
Each portrait type has a clear visual goal: headshots prioritise facial lines and eye contact, fashion highlights silhouette and fabric movement, and e‑commerce focuses on product clarity and consistent framing. Match pose templates to those goals for efficient, repeatable results. Below are practical templates for headshots, fashion and e‑commerce, plus framing notes and a short mapping table. These sequences can be rehearsed in 3–5 minutes per subject to produce a dependable range of images.
Pair these templates with consistent lighting and a simple directional workflow to cut reshoots and give commercial clients reliable images.
Run the quick sequence neutral → friendly → authoritative to cover most client needs and lighting tweaks.
Jawline and chin position are primary levers in headshots. A subtle chin forward and down tightens the jaw and counters camera perspective. Try a three‑shot rhythm: neutral with a relaxed jaw, a friendly smile that reaches the eyes, and an authoritative look with the chin slightly higher. Small head tilts change light fall and shadow in useful ways.
Lens choice and camera height matter: eye level or slightly above flatters most faces by shortening the nose line and reducing under‑chin shadow; lower angles add drama but can create unflattering shadows. Use clear cues like “chin toward me an inch” or “bring the lower jaw forward slightly” for consistent results.
These headshot principles translate into full‑body choices for fashion and e‑commerce where silhouette and proportion matter.
Full‑body fashion and e‑commerce poses prioritise lines, movement and product clarity. Walking sequences — one foot forward, weight transfer, slight torso rotation — create natural motion; seated poses that extend the legs and lengthen the torso can add perceived height and elegance for editorial work. For e‑commerce, keep framing consistent and introduce small dynamic actions — pivot the hips, adjust a sleeve, turn a collar — to show product use while maintaining exposure and background continuity. Choose three‑quarter or full‑length frames for garments and tighter crops for accessories.
These templates work best with clean backgrounds and purposeful lighting; see the equipment notes below.
For studio details and easy online bookings, check the studio info at the end of this guide.
Studio gear extends your posing language: cycloramas, modifiers and props change background separation, shadow quality and how a subject moves in the space. Matching pose to lighting reduces retouch time and preserves texture and colour for commercial work. Below are practical equipment‑to‑pose mappings and a short comparison table to help you choose the right setup quickly during a session.
Pair the right gear with your pose language to turn a capture into a finished image that meets creative or commercial briefs.
Different modifiers and backdrops support specific posing goals; the table below summarises common tools and their benefits.
Choose the gear that supports the pose — you’ll save time and preserve intent in camera.
A cyclorama removes distracting edges and lets you compose full‑body and motion shots cleanly. On a cyc you can position the subject away from corners to create negative space and use backlight for separation; that freedom suits extended limbs and movement without visible backdrop lines. Cycs also speed consistent cropping for catalogues and reduce post‑production work. When shooting on a cyc, control shadow fall with subject distance and a rim light to keep form readable against a bright background.
Working on a cyc encourages you to prioritise movement and silhouette, which then informs your face and fabric lighting choices.
Modifier choice changes shadow quality and should match the pose goal: softboxes for beauty and headshots to minimise texture, strip boxes for fashion to sculpt form, and hard backlight for dramatic silhouettes. Try a key softbox at 45° for flattering short lighting, add a reflector to lift shadows, and use a rim light behind the subject for separation. Small adjustments — raising the key to lengthen the neck or bringing it closer to soften skin — make a big visual difference. Watch catchlights to keep eyes lively. The right light reduces the need for heavy pose fixes and keeps the session efficient.
Mix and match modifiers with pose goals to deliver consistent looks on the day.
For studio details and bookings, check the studio info at the end of this guide.
Advanced posing scales your pose language across campaigns and multi‑subject shoots by establishing hierarchy, consistent lines and interaction prompts that tell a story. Combine hierarchy rules (dominant subject, depth, eye‑lines) with a unified posing language so every image reads as part of the same campaign. Below you’ll find client‑type mappings (e‑commerce, beauty, fashion) to recommended pose styles and studio setups, plus a table linking goals to equipment choices. These templates help creative directors and photographers plan efficient shoots that meet creative and commercial KPIs.
Planning poses and lighting together reduces on‑set back‑and‑forth and speeds delivery while keeping brand storytelling coherent.
Use this mapping to brief stylists and assistants so posing and lighting stay coherent across a set.
Posing different body types is about finding flattering lines while keeping the campaign’s visual language consistent. Adjust stance, weight and limb spacing to highlight strengths: seated or leaned poses to reduce apparent height for very tall subjects, slightly lower camera angles and leg extension for shorter subjects. Clothing affects choices — structured pieces benefit from angled torsos to show silhouette, flowing fabrics work best with motion. Standardise eye‑lines, spacing and lighting so the images read as a set even when individual poses vary.
These inclusive adjustments help deliver campaign imagery that flatters participants while staying true to the brand look.
Good group posing creates visual hierarchy with staggered levels, diagonal lines and a clear focal path. Start with a lead subject slightly forward or on a compositional anchor, then stagger others in depth and height to form pleasing diagonals. Encourage small interactions — a hand on a shoulder, shared glances — to show connection while keeping each person posed. Balance lighting so faces read evenly, and add subtle rim or hair light to separate foreground from background. Use quick choreography — move A, then B, then tweak C — to keep things efficient and natural.
Follow these rules and a chaotic group becomes a composed visual story that works for editorial or corporate briefs.
For studio details and easy online bookings, see the studio info at the end of this guide.
Frequent issues — tense hands, client anxiety, stiff posture and technical limits — are fixed with short behavioural exercises, micro‑directions and small gear tweaks. Diagnose the problem (for example, tight hands), apply a targeted remedy (props, pockets, soft fist), and confirm the fix with a quick test shot. Below are troubleshooting lists for top problems plus micro‑exercises and fallback poses when a subject remains uncomfortable. Addressing these early keeps the session moving and improves the client experience.
Begin a tricky session with a 3–5 minute warm‑up of movement prompts and breathing to reset posture and expression.
These quick fixes usually deliver immediate, usable improvements and set up finer adjustments.
Give hands purpose — don’t leave them dangling. Props, relaxed fists or gentle touch gestures create intention and hide micro‑tension. Offer specific placements like “rest fingertips on the chin” or “hold the lapel lightly.” Use a tactile release: ask the subject to open and close their hand slowly, then hold the relaxed shape. Keep hands slightly forward of the torso to avoid crushing the silhouette; if a hand still looks awkward, crop tighter for that frame and reposition for the next. Usually one or two frames fixes the issue.
Natural hands finish the pose and reduce heavy retouching later.
Client nerves respond to short, structured warm‑ups, clear expectations and incremental tasks that build confidence. Start with a 60‑second orientation, run a 3‑minute movement warm‑up, then deliver three guaranteed flattering frames. Use a pre‑shoot line like “we’ll take a few test frames — you can look away anytime,” then move into calibrated prompts: “walk to the mark, stop, breathe and look me in the eye.” If someone stays uncomfortable, switch to seated poses, tighten the frame to head‑and‑shoulders, and use reassuring language that emphasises control. These tactics create quick wins and usually turn anxiety into collaboration.
Successful warm‑ups and micro‑directions lead to more natural expressions and better overall session output.
For studio details and to make online bookings for studio hire, read the studio info below.
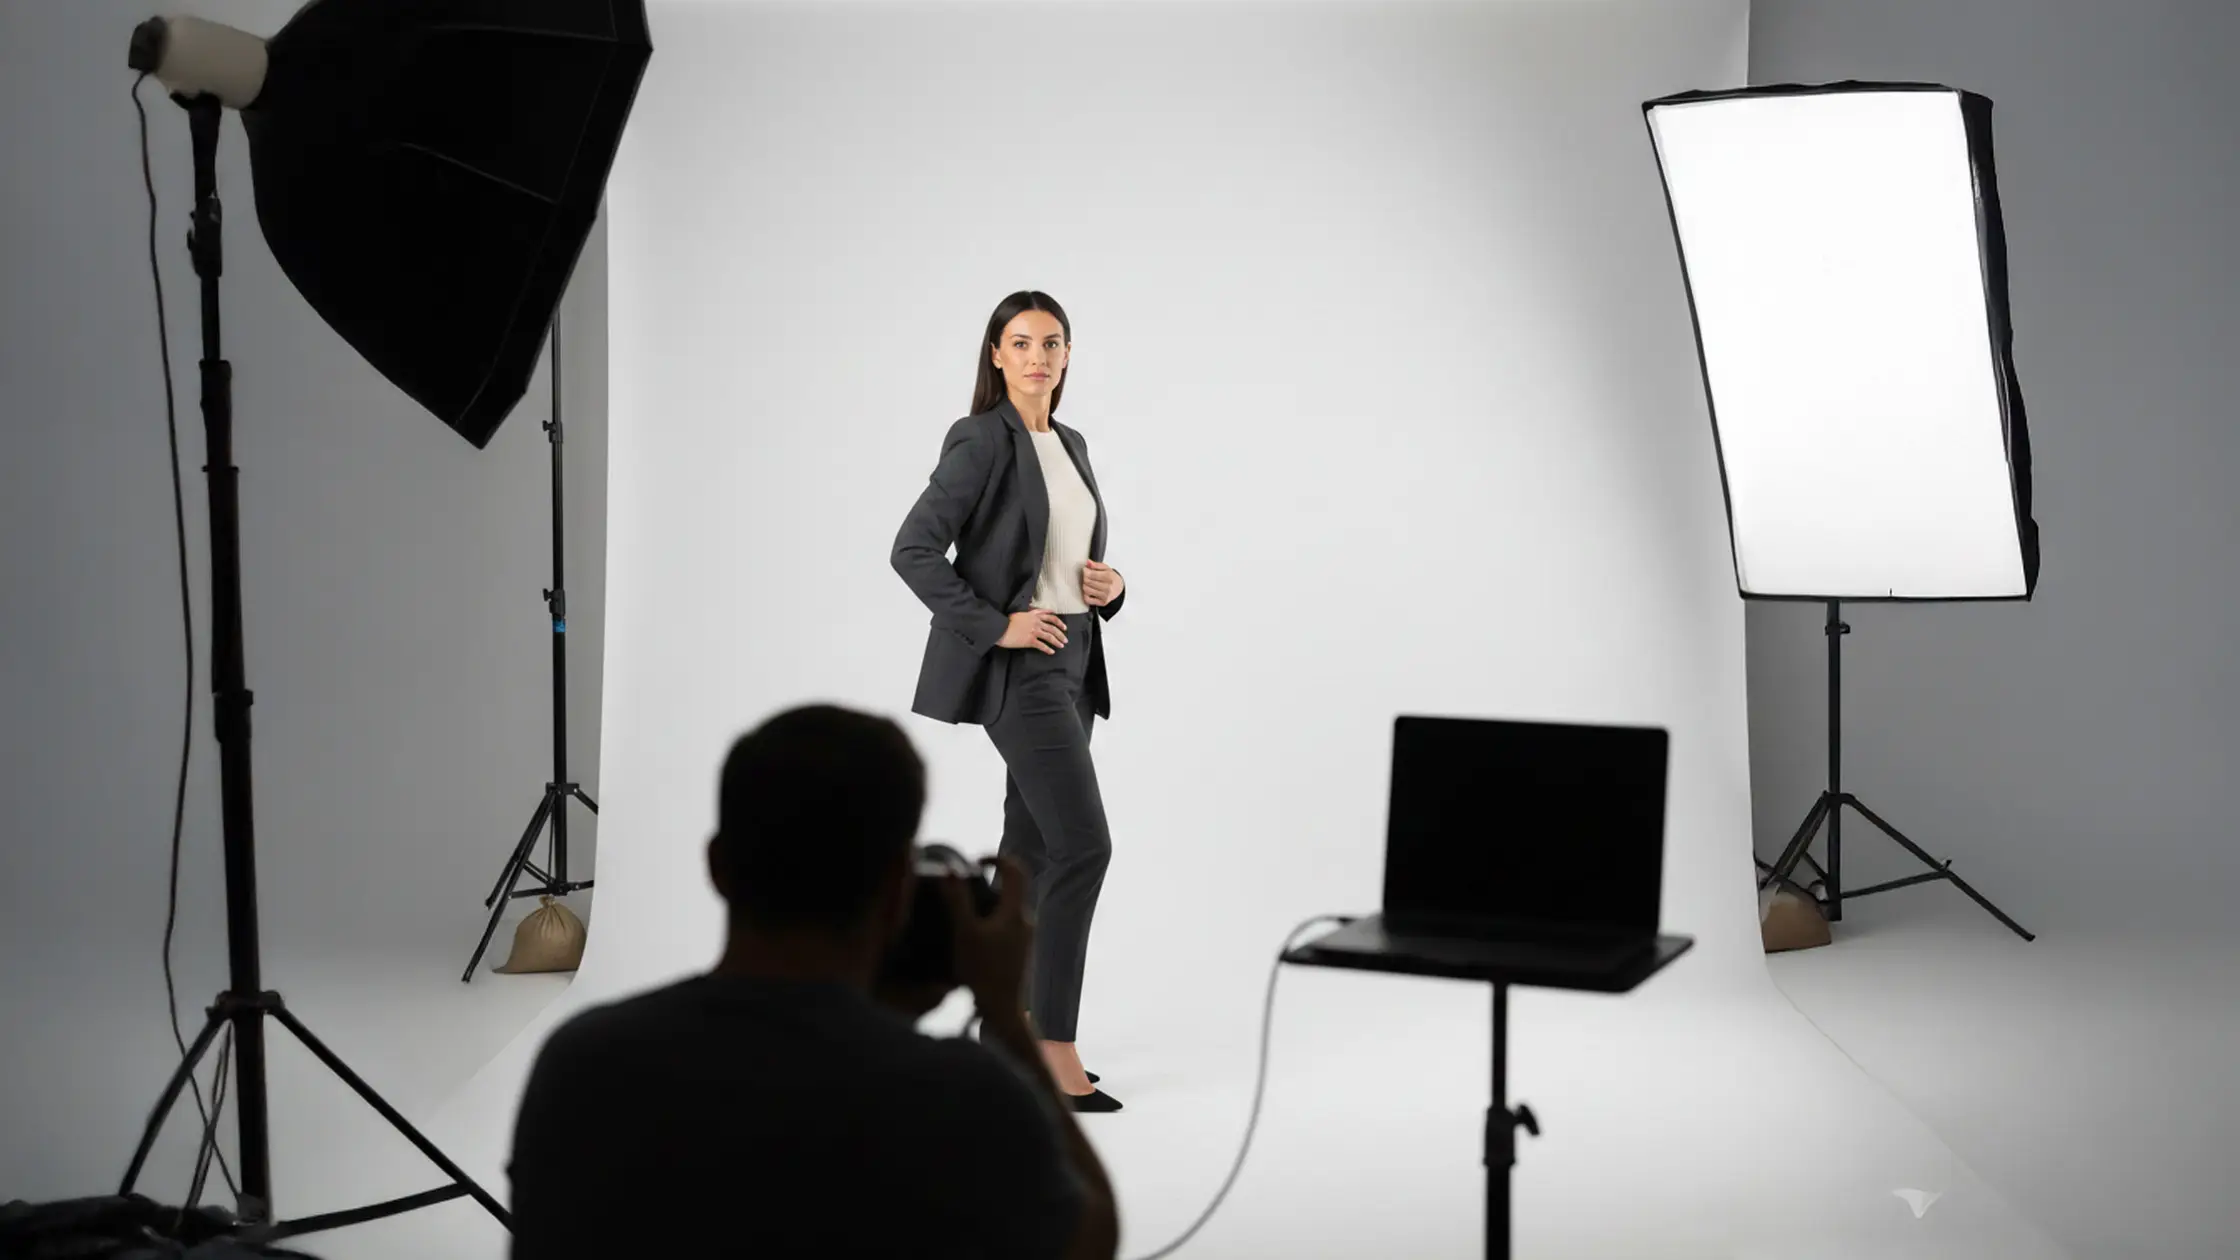
Bohemia Bay Studio is a self‑access photography space in Bayside Melbourne, offering studio hire for product, portrait, content, fashion, e‑commerce and beauty shoots. The studio provides professional lighting, a white cyclorama and fully equipped space. Bookings are available online with instant access codes, and the studio is open daily from 7:00 am to midnight. Primary service: studio hire — ideal for practising and delivering the posing techniques described here.
Our kit and cyc make it easy to apply these posing strategies in a controlled, repeatable environment.
Follow these steps to cut setup time and increase the chance of delivering campaign‑ready images on the day.
Bohemia Bay Studio’s self‑access model, cyclorama and professional lighting make it an ideal space to practise and execute these posing techniques efficiently — whether you’re shooting single portraits or multi‑subject commercial work.
Headshots focus on facial expression and eye contact to create a direct connection. Fashion prioritises silhouette, movement and how garments fall. E‑commerce centres on clear product visibility, consistent framing and accurate colour. Knowing these goals helps you pick the right pose templates and techniques for each job.
Props give subjects something to do, which reduces tension and creates natural poses. A chair encourages relaxed seated work; small items like hats or scarves give hands purpose. Choose props that fit the shoot’s concept and enhance the subject without distracting from the composition.
Common group mistakes are overcrowding the frame, skipping hierarchy and leaving everyone on the same level. Stagger heights and depths so the image has diagonal lines and a clear focal path. Encourage interaction to create connection and always check lighting for even exposure across faces.
Lighting defines how poses read. Soft, diffused light flatters skin and suits headshots and beauty. Strong, directional light adds contrast and emphasises form for fashion. Understanding how fill light techniques with reflectors interact with poses lets you create the intended mood and highlight a subject’s best features.
Start with a short orientation, use warm‑ups like gentle movement or breathing, and give clear, positive directions. Encourage small, actionable tasks and remind clients they can pause or look away between sets. Those simple steps reduce anxiety and produce better expressions.
Create a set of pose templates that match the brand’s visual language, use the same lighting and backgrounds for every subject, and share clear guidelines for angles, expressions and spacing. A reference board with sample poses helps everyone stay aligned and keeps the final images cohesive.
Explore More Insights from The Studio